Making the Intel X710-DA4 Work…

Apparently, making this 4x SFP+ card work is not as straight forwards as I thought…

  • LACP (aka Link Aggregation aka 802.3ad) would not work properly under Linux, Windows, VMware or FreeBSD unless a “private flag” was disabled using ethtool (source #1, #2)

Sigh, so much for “plug and play pray”…

As per the source/s instructions, I created a /etc/networkd-dispatcher/configuring.d/90-disable-on-chip-LLDP.sh:

#!/bin/sh
if expr "$IFACE" : <interface prefix> >/dev/null; then /sbin/ethtool --set-priv-flags "$IFACE" disable-fw-lldp on fi

WARNING: Make sure your <interface prefix> is able to only address the X710 interfaces, or you will likely get errors or, worse, brick your NIC. As an example, my X710 interfaces are all named enp1s0fN so I use the <interface prefix> of “enp1s0f”

To check, simply give the command ethtool --show-priv-flags <interface prefix>.

netplan Not Going To Plan…

With a /etc/netplan/00-global.yaml having the following contents:

network:
  version: 2
  renderer: networkd

And all other .yaml files in the /etc/netplan directory not having an explicit renderer, the system should default to networkd… Just netplan apply and done! Simple, right?

Yeah, right.

Seems like netplan apply still thinks to use NetworkManager even when no single .yaml file declares its use; and since I disabled and masked the service, netplan apply was complaining NetworkManager was masked.

The secret sauce?

Continue reading

Qotom C3758R Part III…

OPNsense

Given the Linux bridge and QEMU KVM pass-through performance hit, I tried to install OPNsense (based off FreeBSD) and attempted to dual-boot.

Why OPNsense? That was the main reason I originally bought this C3758R unit in the first place – attempting to see if higher performance-to-power efficiency could be achieved with Intel QAT – pfSense’s QAT libraries are only available in their subscription-based pfSense+ product.

In short: a f*cking huge mess…

  • install using custom (not “Auto”) partitioning
  • the installer was UEFI-compatible so managed to find and write its bootloader into the FAT32 EFI partition – since the Ubuntu bootloader mounts the EFI System Partition (aka “ESP”) as /boot/efi, the full path in Ubuntu was /boot/efi/EFI/freebsd/loader.efi
  • but GRUB wasn’t updated, so edit grub:
    • /etc/grub.d/40_custom:
menuentry "OPNsense" {
	insmod ufs2
	insmod zfs
	set root=(hd0,gpt4)
	chainload (hd0,gpt1)/EFI/freebsd/loader.efi
}
      • changing “gptN” to whatever you see as the correct partition when doing an “ls -l” in grub, where the root is the FreeBSD UFS/ZFS partition, and the chainloader is pointing to the ESP
      • removing one of the two insmod lines where not required (i.e. FreeBSD root is UFS or ZFS formatted)
    • run update-grub
  • install the MOK using the UEFI firmware (i.e. the /EFI/freebsd/loader.efi file) – otherwise secure boot would prevent the FreeBSD bootloader from working


That fixed, things went from bad to worse…

Continue reading

The Qotom C3758R Unit Continued…

Just a quick update on networking experiences with this fanless (but hot) unit…


Why Is It Not In Sync? (buy buy buy)…

For some odd reason, throughput on stock Ubuntu 24.04 LTS via a 10GbE SFP+ module was showing asymmetrical speeds on iperf3 – ~10Gbps in, but only ~6Gbps out. Checking the firewall, ensuring jumbo packets (9000 byte MTU), ensuring ufw was disabled, disabling all forms of NIC offloading (although this may actually be inverse to the intended) did not change anything. Furthermore, htop showed one core constantly maxing out when sending (but hovering 60% to 75% on receiving).

Continue reading

10GbE and Jumbo Packets…

For the longest time, I was painfully aware that I was not utilising my 10GbE network switches and NICs to its fullest.

Having to finally sit down, build, test and optimise a software firewall using 10GbE interfaces for some organisation I volunteer at and therefore having to test it in my home lab, I finally was “forced” to sit down and “optimise” my local home lab.

An iperf3 test was not showing good numbers – bouncing around the ~8Gbps mark on a 10Gbps network.

Without fluffing around with kernel and IP stack tweaks, I was aware the easiest way to eke out better performance was to increase the MTU…

Continue reading

Headless Servers, Dancing KVM-Bewitched Screens…

When using a headless server, certain operating systems’ window managers don’t handle a lack of attached display properly, often ending up with issues when attempting to remotely mirror/access session 0. Some workarounds exist, including “faking a display“, but that has serious side-effects when actually hooking up a real display or when working with some software that could add virtual displays (making that “fake display” suddenly part of a multi-monitor setup which you can’t see).

Similarly, most window managers flail (not fail) spectacularly when one or more displays is/are switched away from it (when using a KVM that does not have EDID emulation), resulting in screen resizing, application window movements et. al., and switching it back fails to relocate certain windows and UI elements back to the previous location/size/state. Whereas this point may be more an issue with combination of OS and application, it is still an irritating issue for KVM users.

The simple solution I have found is to always use a HDMI EDID emulator with pass-through at the output display port/s, meaning that:

  1. for the former use case (of headless servers), the machine always thinks a display is attached and session 0 will be on that/those “display/s”, with the ability to just plug my 13.3″ portable monitor* via HDMI (and still stay sane)
  2. and for the latter use case, I can switch away one or more displays and the machine still thinks the display/s are working – ergo no “dancing” windows

This has certain limitations though:

  • unless the pass-through copies the EDID of the sink (i.e. display), the output (i.e. resolution, refresh rate, audio capabilities) will be limited to the EDID “mode”/capabilities of the HDMI emulator
    • some emulators fail to copy the sink’s EDID after starting/initializing (instead using some preset), so for those oddballs, you will need to ensure you start up the system (i.e. start providing power to the pass-through emulator) with the display “attached” (e.g. KVM switched to machine being started)
  • “unusual” modes (like wide and ultra-wide screens like the my 5120×1440@120/144Hz Prism X490 Pro* and Asus XG49WCR* with high refresh rates) or attempting to use HDR and/or VRR features would fail, with HDMI sync limited (usually to UWQHD i.e. 3440x1440p @ 30Hz with no audio)

This site DOES say the stuff we USE, not the stuff we wanna sell. :)

    • I am guessing here, but
      • maybe the HDMI pass-through emulators just cannot handle bandwidth required and therefore will have to sync at lower rates/modes
      • maybe the HDMI emulator’s EDID table does not have the modes in question – not sure if reprogramming the EDID one would work

For easy reference (and purchase, if you will), I use several of these:


*NOTE: This is an affiliate link, so I may get some commission, but at no additional cost to purchasers purchasing through this link. For Amazon Affiliate links, as an Amazon Associate, I earn from qualifying purchases.

Secure Boot Shim-anigans Ahoy!

So, I had to purchase a new laptop for someone, and as per usual, it came with the entire SSD capacity allocated, which I still feel is bad practice – specifically ensuring there is unallocated space that the drive firmware knows about, assuming TRIM is supported by both OS, controller and drive, (which, AFAIK, all “modern” OS and hardware do) to improve the drive’s wear-leveling ability and thereby extending the SSD’s lifespan.

To do so, I use a “rule of thumb” to leave ~20% of unpartitioned space – at the “end” of the disk (from a “logical” view of the partition table, regardless MBR or GPT). Usually, I simply use a “multi-boot” USB stick created using YUMI or Ventoy (the former now looking like a “wrapping” of the latter in its latest “exFAT” variant).

Aware of the shenanigans/rain dance required to make UEFI secure boot work from such bootloaders, like hundreds of other times (but never done for awhile), I simply (1) disabled CSM in BIOS, (2) enabled secure boot (and rebooted), (3) manually loaded the ENROLL_THIS_KEY_IN_MOKMANAGER.cer into the key store via BIOS from the prepared Ventoy USB disk…

I then confidently rebooted the laptop, pointing to the USB UEFI as the boot device, then ran headlong into the wall with a sickening SMACK. The wall was black, with only the words “Verifying shim SBAT data failed: Security Policy Violation” emblazoned across the top…

Attempting to fix this on this “new” laptop took me off on tangent, wasting nearly a half day trying to research and resolve… Hopefully this helps someone else with the “summary” below, assuming you have a working Linux system that can mount the USB device’s bootloader (i.e. EFI partition), since Windows cannot (without jumping through hoops)…

Continue reading

Replacing Multiple Spinning Disks Simultaneously or Serially…

So, with a 6-drive RAIDZ2, I faced a drive failure over a year ago with a “hung” Windows host (hosting the Ubuntu Server LTS Hyper-V VM with pass-through, direct access to the 6 physical HDDs used for the RAIDZ2 array) – the Windows UI was still responsive but any drive reads (e.g. Windows Explorer navigation, starting an app) “hung” the offending app attempting the drive reads (even if the dying drive was not the drive being read from)… With 2x 6TB “spares” on hand purchased over time (2017, 2018) for just such an event, a VM-and-host shutdown, HDD swap and a quick zfs replace <pool> <old GUID> <new /dev/sdx> and a “quick” resilver brought everything back to normal.

Then, three months back, I then started facing 2 failed drives – I had the one remaining 6TB “spare” replacement drive for the first, but after a 2nd failure in the span of these three months (without purchasing another set of standby replacements), it was time to start considering replacing all the drives (slowly).

Not too shabby, with ~7+ years’ lifespan of near 24/7 powered-on, low-drive write loads, with some pretty bad temperatures (near constant 50°+C to 60°C, no matter how I tried to force air flow when these were still in the DS380):

  • 2x Seagate ST6000DX001:
    • from March 2015
      • 1x failed in August 2016; RMA/replacement still running
  • 2x Seagate ST6000DM001:
    • from November 2015
      • 1x failed in November 2022
      • 1x failed in November 2023
  • 4x Toshiba X300 HDWE160:
    • 2x from July 2016
    • 1x from November 2017 (spare)
      • 1x (surprisingly the replacement drive from November 2017 that was “just” plugged in in November 2022) (just) failed in February 2024
    • 1x from November 2018 (spare)

I therefore purchased 2x Seagate Exos X18 16TB HDDs, with another still on the way… Wanting to minimise the number of resilver attempts (straining the surviving 6TBs), I attempted to pull a working drive from the degraded 5-drive RAIDZ2 array and plugged both new 16TBs in, fingers crossed that none of the remaining 4 drives give up the ghost while resilvering (confident I had important data backed up elsewhere).

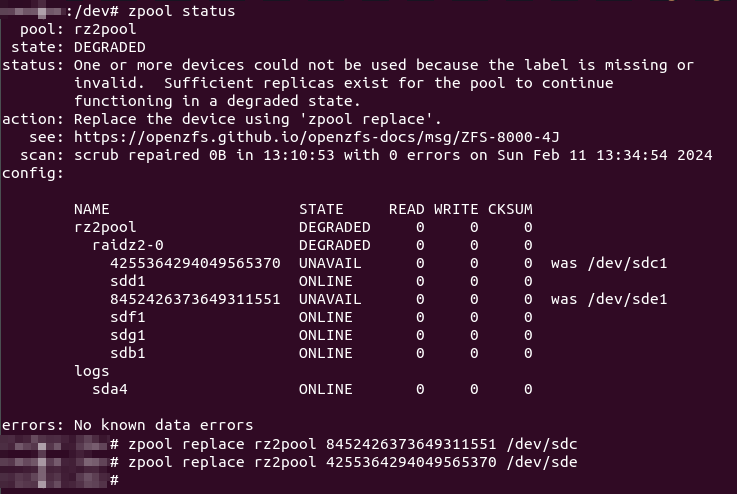
I gave the replacement commands one after another:

2024/03/03 Update: Don’t assign the whole disk, manually create a partition instead and assign that as replacement instead!

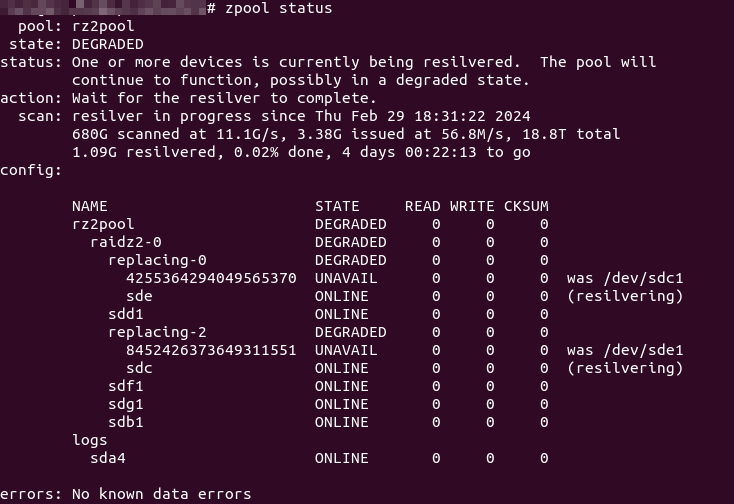
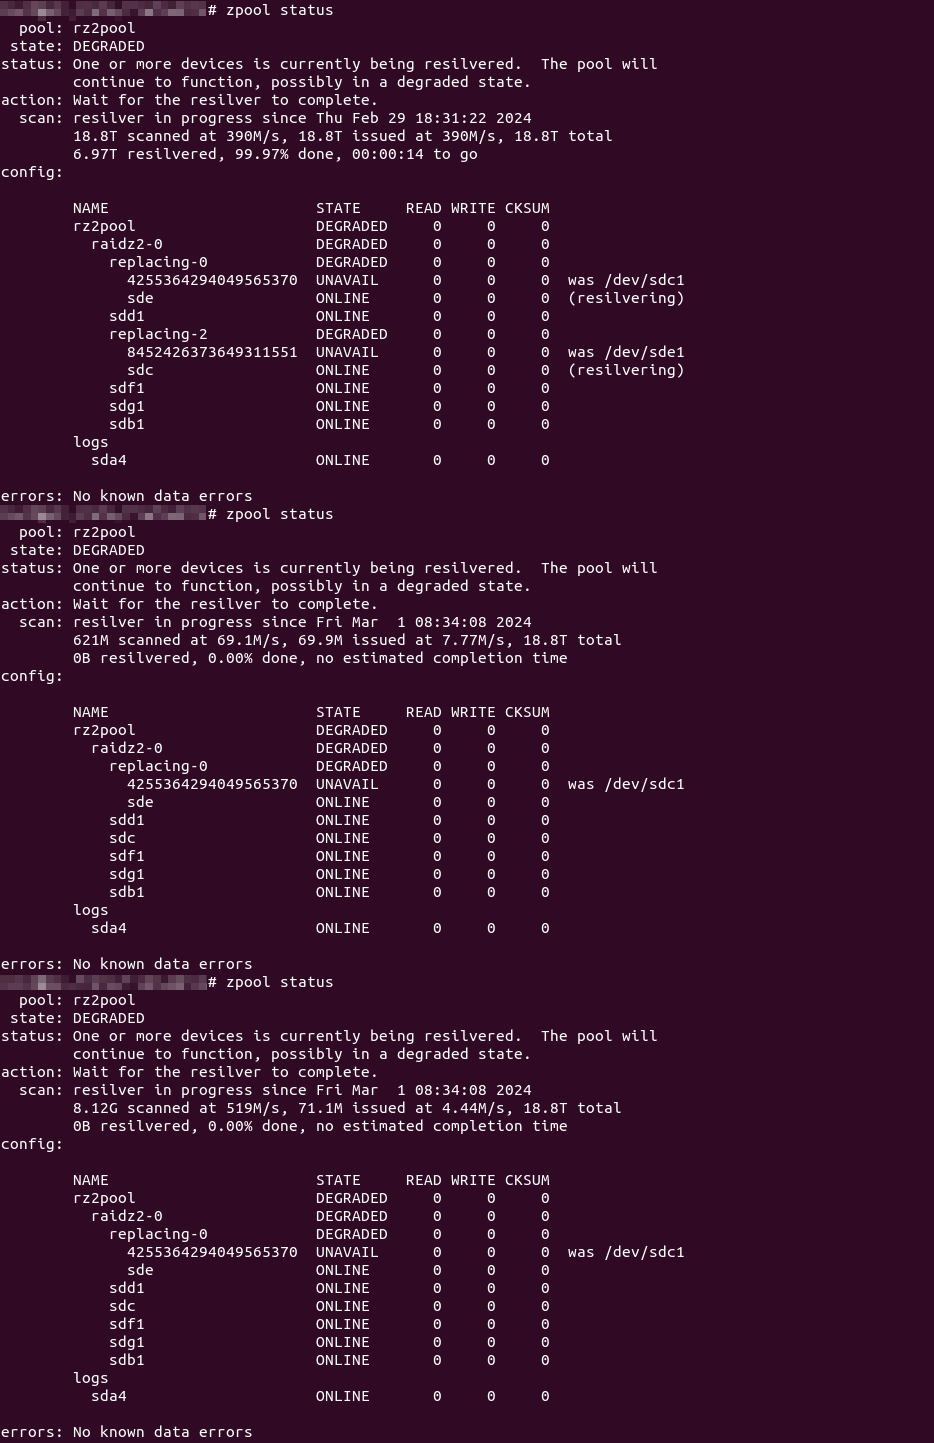
And that seems to work… So, 11+ hours later, nearing the end of the resilver process, I was eagerly checking the status…

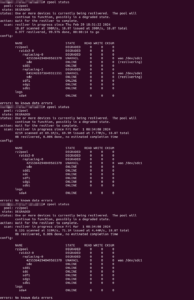
Wha..?!? Resilvering only completed on one drive (and was only now starting on the other)!

Continue reading

Breaking My Bluetooth Disconnecting-Reconnecting Cycle…

For some odd reason, some Windows 10 update or software of some sort seems to have suddenly borked my Bluetooth connection/s, whereby any Bluetooth headset and/or speaker would disconnect and reconnect repeatedly from my Bluetooth 5.0 radio (that came with the after-market Intel AX200 Wi-Fi 6/802.11ax NGFF M.2 card I installed on my PC)… I do not have other Bluetooth device types to test, so cannot say if other devices would have also experienced the same connect/disconnect cycle.

Nevertheless, I quickly found a solution: disabling power saving on the “USB hub” devices the “Intel Wireless Bluetooth” device was hanging off… (Assuming you have administrator rights/permissions on Windows…)

Continue reading

Logitech G933 Microphone Borked by Own Logitech Software…

OK, so I love headsets that have their own microphone toggle switch that is not tied to some software switch requiring a mouse click or even a keyboard shortcut or press. The switch can be a physical in-line flick or push button switch for wired headsets, or, in my current case, a flick up/down microphone on my wireless Logitech G933 headset I purchased quite a while back…

Recently, with the pandemic raging all around and Work-From-Home (WFH) being the norm, a good headset with microphone control was a must.

Unfortunately, for some odd reason, my Logitech G933 headset microphone started to “crap out” – once muted (i.e. flipped up) the microphone would never re-activate, even with repeated power cycling of the headset. Only a reboot would work…

Frustrated, I was finally ready to throw the headset away when I tried it with another laptop… It worked without issues… I suddenly remembered about the Logitech G Hub software that was running (and not running very well at that – it hangs on the loading screen, which I previously tried troubleshooting but never got anywhere).

I killed the G Hub process and suddenly, my headset was working just fine again!