Windows Set-Up
OOBE
- at any point in OOBE, get elevated command prompt pressing
Shift+F10
- to shut down the OOBE, get an elevated command prompt as above, then follow the instructions here
- to reboot from the OOBE, get an elevated command prompt as above, then follow the instructions here
- to reboot to UEFI from the OOBE, get an elevated command prompt as above, then follow the instructions here
- bypass unnecessary Internet connectivity prerequisite
- ensure Internet not already connected (i.e. cable disconnected and/or WiFi profile not created – if already connected via WiFi, refer to below to delete)
- using elevated command prompt, run
C:\Windows\System32\OOBE\BypassNRO.cmd(effectively just typeOOBE\BypassNROand pressEnterat the elevated command prompt when opened) - system will reboot
- if Internet still connected on reboot, Microsoft will still force their stupid online account down your throat
2025/10/07 Update: F*cking Microsoft has disabled the above methods and more (with lame excuses to boot). Your best bet (at time of update) is to create your own bootable Windows installation image with a local account already created with some other settings disabled (with one easy method of using Rufus)
- delete WiFI profiles
- using elevated command prompt, run
netsh wlan show profiles - delete profile using
netsh wlan delete profile name="<profile>"
- using elevated command prompt, run
- run registry editor
- using elevated command prompt, run
regedit
- using elevated command prompt, run
Hiding Windows Accounts
- to hide Windows accounts from the Logon screen:
- create DWORD entries with the user names under registry key
HKEY_LOCAL_MACHINE\SOFTWARE\Microsoft\Windows NT\CurrentVersion\Winlogon\SpecialAccounts\UserList
- create DWORD entries with the user names under registry key
Cleaning Out Windows 11 Preinstalled Crapware and Niusances
- the easiest method is to use a “debloater” (follow the instructions as posted using and administrator Powershell session)
- for (my own) convenience, my “predefined settings” are here (unzip to
%TEMP%\Win11Debloater)
Windows “Special” Folders
Common “Special” Folders
- The following is a list of common special folders and their default locations:
| Name | Location | Environment Variable (if any) | Comments |
|---|---|---|---|
| Start Menu (All Users) | C:\ProgramData\Microsoft\Windows\Start Menu\Programs |
||
| Start Menu (Current User) | %AppData%\Microsoft\Windows\Start Menu\Programs |
Moving/Changing Locations
- There is a handy Powershell script available to move special folders (local copy here).
Checking for Network Optimisation
- particularly on high-speed links (“high speed” as of writing this, i.e. >= 10Gbps) coupled with multi-core CPUs, Windows RSS (receive-side scaling) should be enabled to ensure better throughput (credit)
- run
netsh interface tcp show globalfrom an administrator command prompt
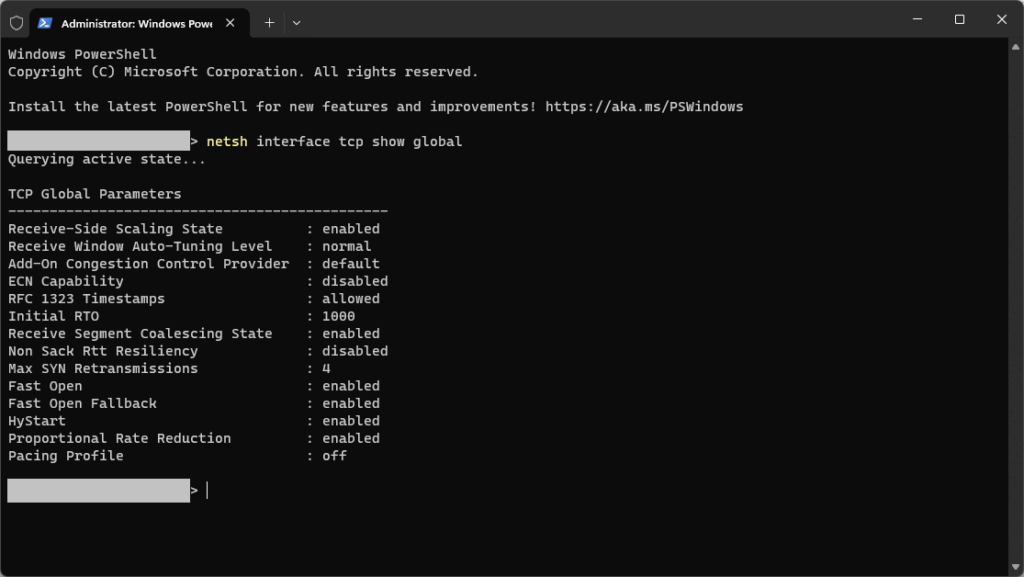
- if it is disabled, enable it (and auto-tuning) with:
netsh interface tcp set global rss=enablednetsh int tcp set global autotuninglevel=enabled
- if it is disabled, enable it (and auto-tuning) with:

Dual/Multi-Booting w/Ubuntu
As per usual, Microsoft’s “I’m the thousand-pound gorrilla” attitude (which is still several orders of magnitude better than Apple’s “f*ck” everyone else, including its users), installation of Windows means any other OS previous installed on a separate partition would now not be accessible.
To dual/multi-boot with Windows, it is usually easier for Windows to be the first OS for a multi-OS/multi-boot set up (instead of “cleaning up” after Windows installation stomps all over the ESP).
- the steps below assume:
- Windows on UEFI machine (i.e. anything before/below Windows Vista SP1 is not applicable)
- you will have pre-created partitions for the Windows installation, or will use manual installation steps to create and install to separate partitions – instructions for which are out of scope of this guide
- if you are multi-booting multiple Windows installations, then you should do this only after the last copy of Windows is installed
Ubuntu Installed Last
- install Ubuntu (on to a separate partition) – the installation procedure should automatically set up the ESP with GRUB and add in entries for found/existing OSes
-
- if not, you may have to either:
- not recommended
- edit
/etc/default/gruband enable (i.e. uncomment)GRUB_DISABLE_OS_PROBER=falseand ensure that/etc/grub.d/30_os-proberis working
- edit
- recommended
- identify which partitions are the (i) Windows OS partition and (ii) EFI System Partition aka ESP:
lsblk -o NAME,PARTN,LABEL,PARTLABEL,UUID
- edit
/etc/grub.d/40_customand insert the below
- identify which partitions are the (i) Windows OS partition and (ii) EFI System Partition aka ESP:
- not recommended
- if not, you may have to either:
-
menuentry 'Windows' {
    search --fs-uuid --no-floppy --set=root <UUID>
    chainloader (hd0,<gptN>)/EFI/Microsoft/Boot/bootmgfw.efi
}
-
-
-
-
- where:
- UUID is the UUID of the EFI System Partition
- gptN is the partition number (i.e.
PARTN) of the identified partition
- where:
-
-
-
Windows Installed Last
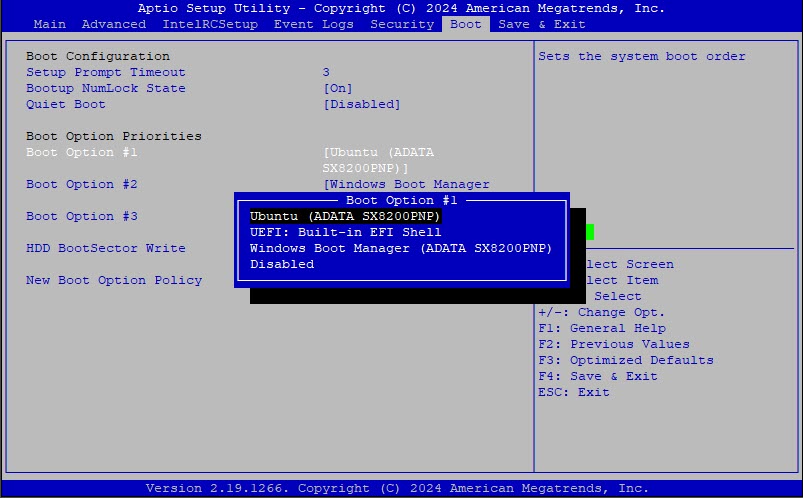
- if the above is not true (i.e. you installed Windows last), then:
- ensure that your UEFI BIOS is set to boot the “Ubuntu” EFI (rather than the Windows Bootloader), or whatever
bootloader-idGRUB “informs” the UEFI system to show the EFI entry as
- ensure that your UEFI BIOS is set to boot the “Ubuntu” EFI (rather than the Windows Bootloader), or whatever
-
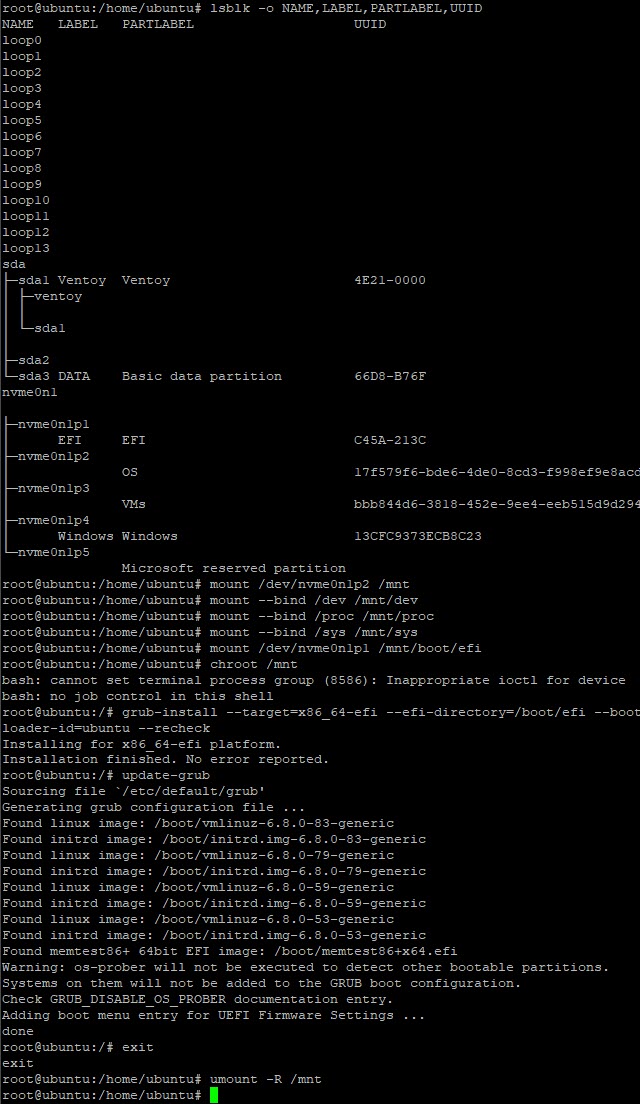
- reboot into a Ubuntu “live” desktop environment
- open a terminal and
sudo bashto load a root shell- identify which partitions are the (i) Ubuntu OS partition and (ii) EFI System Partition aka ESP:
lsblk -o NAME,LABEL,PARTLABEL,UUID
- mount relevant partitions and remap some key directories and chroot:
mount /dev/<Ubuntu partition> /mntmount --bind /sys /mnt/sysmount --bind /proc /mnt/procmount --bind /dev /mnt/devmount /dev/<ESP> /boot/efichroot /mnt
- (re-)install grub:
grub-install --target=x86_64-efi --efi-directory=/boot/efi --bootloader-id=GRUB --recheck- NOTE: feel free to replace “GRUB” with some other identifier that makes sense to be shown in a motherboard’s UEFI “boot” screen (default for Ubuntu is actually “Ubuntu”)
- run
update-grub
- identify which partitions are the (i) Ubuntu OS partition and (ii) EFI System Partition aka ESP: