Ubuntu LTS Set-Up
It is not every day that I have to set up a fresh install of Ubuntu, and I end up forgetting and having to repeat research on specific “tweaks”. I am now using this page as my own reference, based on an installation on x86-64 architecture hardware.
“Live” Ubuntu USB/CD
- it is possible to launch a “live” Ubuntu environment, complete with graphical UI (assuming all relevant drivers to support the hardware are already included) from a “live” Ubuntu desktop (i.e. not server)
- if setting up serial console access, either create a custom version, or edit the GRUB boot entry (i.e. press “
e” to edit the boot options), add the serial port configuration e.g.console=ttySN,115200n8, then pressCtrl Xto boot with the edited kernel parameters - if accessing via serial console, the username is “ubuntu” with an empty/no password
netplan
- assuming netplan is being used and rendered using
systemd-networkdinstead of Network Manager, an example of a netplan YAML file20-br0.yamlwith LACP ports and VLANs is as follows:network: version: 2 renderer: networkd ethernets: # ETH0 port at back of AMD 8845HS M/B enp3s0: dhcp4: false optional: true mtu: 9000 # ETH1 port at back of AMD 8845HS M/B enp4s0: dhcp4: false optional: true mtu: 9000 bonds: bond0: interfaces: [ enp3s0, enp4s0 ] mtu: 9000 parameters: mode: 802.3ad lacp-rate: fast mii-monitor-interval: 100 transmit-hash-policy: layer2+3 bridges: # LAN interface br0: dhcp4: false interfaces: [ bond0 ] addresses: [ m.n.o.p/24 ] routes: - to: default via: m.n.o.1 nameservers: addresses: [ m.n.o.1 ] mtu: 9000 vlans: bond0.7: id: 7 link: bond0 accept-ra: no bond0.8: id: 8 link: br0 accept-ra: no bridges: br1: dhcp4: false interfaces: [ bond0.7 ] addresses: [ a.b.c.d/24 ] nameservers: addresses: [ a.b.c.1 ] mtu: 9000 br2: dhcp4: false interfaces: [ bond0.8 ] addresses: [ w.x.y.z/24 ] nameservers: addresses: [ w.x.y.1 ] mtu: 9000
SSHd
- install ssh
apt install openssh-serversystemctl enable ssh
- create public key in
~/.ssh/authorized_keys - configure SSHd
- ensure the “main”
/etc/ssh/sshd_confighas theInclude /etc/ssh/sshd_config.d/*.confdirective at the very first active/non-commented line - create
/etc/ssh/sshd_config.d/00-default.confwith the following:# enable tunnelled password authentication PasswordAuthentication yes ChallengeResponseAuthentication yes # enable public key authentication w/possible less secure RSA keys PubkeyAuthentication yes PubkeyAcceptedKeyTypes=+ssh-rsa AuthorizedKeysFile .ssh/authorized_keys .ssh/authorized_keys2 # use local PAM UsePAM yes # disable root login PermitRootLogin no PermitEmptyPasswords no # enforce pubkey THEN password requirement: AuthenticationMethods publickey,password X11Forwarding yes AllowAgentForwarding no AllowTcpForwarding no PrintMotd no
- ensure existing ‘root’ SSH session/alternate root access in case of required rollback
- restart SSHd – any configuration issues would prevent service from restarting:
systemctl restart ssh
- test SSH log in with authorized public key then password
- ensure the “main”
Window Manager and GUI
- install a GUI/desktop for Ubuntu server
apt install lightdm
Yes, I know
lightdmruns as root, vs.gdm3which only runs the “greeter”/login manager but passes ownership to the current logged-in user, but to makex11vncwork (instructions below), ends up requiring a whole litany of complex work-arounds (like here and/or here)…apt install ubuntu-desktop dbus-x11
x11vnc
- assuming
lightdmhas been installed (as above) - install
x11vnc:apt install x11vnc
- create the password file for VNC access (past initial “one-password-for-all” authentication, the VNC window appears and OS credentials are then required):
- as
x11vncwould runs aslightdm(by service configuration below), create a directory to store the password file then secure it:mkdir /etc/x11vnc.d touch /etc/x11vnc.d/vncpasswd
- as
-
- run
x11vnc -storepasswd /etc/x11vnc.d/vncpasswdthen enter the password on the masked prompt
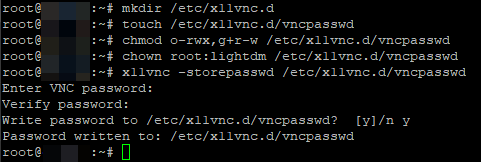
- then ensure the proper ownership and permissions are set:
chmod u+rw-x,g+r-wx,o-rwx /etc/x11vnc.d/vncpasswd
chown root:lightdm /etc/x11vnc.d/vncpasswd
- run
- create the
/etc/systemd/system/x11vnc.serviceservice file:[Unit] Description=Start x11vnc at startup. After=multi-user.target display-manager.service [Service] Type=simple User=lightdm ExecStart=/usr/bin/x11vnc -auth guess -forever -loop -noxdamage -repeat -rfbauth /etc/x11vnc.d/vncpasswd -rfbport 5900 -shared -display :0 ExecStop=killall x11vnc Restart=always RestartSec=3 [Install] WantedBy=multi-user.target graphical.target
- reload
systemdconfiguration:systemctl daemon-reload
- enable
x11vncservice:systemctl enable x11vnc
- disable Wayland
- edit
/etc/gdm3/custom.confand remove the comment mark (“#” character) from the line#WaylandEnable=false
- edit
- reboot
2025/09/06 Update: If you are wanting to copy-paste bidirectionally across VNC client and
x11vnchost environments, please look here.
Resetting/Overwriting the X11vnc Password
- if you forget the password, you could simply overwrite the password, remembering to (re)set the correct permissions:
x11vnc -storepasswd /etc/x11vnc.d/vncpasswd
chmod u+rw-x,g+r-wx,o-rwx /etc/x11vnc.d/vncpasswd
chown root:lightdm /etc/x11vnc.d/vncpasswd
Decrypting the x11vnc Password
- if want to retrieve the x11vnc password instead of just overwriting it, here’s vncpwd to the rescue!
Truly Headless with Dummy Monitor
- to be truly headless, create a “dummy” video card and monitor
- WARNING: if after implementing this, an actual display is plugged in/used, it would be part of a multi-monitor setup – I tend to prefer HDMI EDID emulators with pass-through ports (more on that here)
- w.r.t. this Stack Exchange answer, create the following sections in
/etc/X11/xorg.conf:Section "Device" Identifier "Configured Video Device" Driver "dummy" VideoRam 40000 EndSection Section "Monitor" Identifier "Configured Monitor" HorizSync 22-83 VertRefresh 50-70 Modeline "1920x1200_60.00" 193.16 1920 2048 2256 2592 1200 1201 1204 1242 -HSync +Vsync EndSection Section "Screen" Identifier "DefaultScreen" Monitor "Configured Monitor" Device "Configured Video Device" DefaultDepth 24 SubSection "Display" Depth 24 Modes "1920x1200" EndSubSection EndSection
systemd-networkd
boot delays
- tired of those 120s boot delays while the network waits for DHCP (and there isn’t a DHCPd or a even a network link)?
- follow this fix:
sudo systemctl disable systemd-networkd-wait-online.servicesudo systemctl mask systemd-networkd-wait-online.service
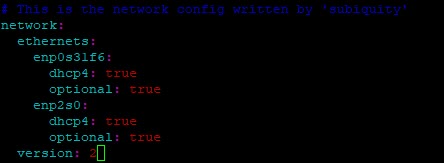
- also mark all unneeded interfaces as optional e.g. in
/etc/netplan/nn-whatever.yaml:
- to find out which services are impacted:
sudo systemctl show -p WantedBy network-online.target
resolv.conf and DNS Resolution
- if using
systemd-networkd,/etc/resolv.confmay get overwritten (or to be technically correct, regenerated) and the correct/recommended practice should be to either edit/etc/systemd/resolved.confor add some file in/etc/systemd/resolved.conf.d/(e.g./etc/systemd/resolved.conf.d/00-default.conf):[Resolve] DNS=8.8.8.8
- to check, run
systemd-analyze cat-config systemd/resolved.conf
networkd-dispatcher
- if you need to run “hook” scripts ala
ifupdownof ‘ye ol days, or even just advanced configuration like turning off offloading in/etc/network/interfaces,netplanjust made it unnecessarily more complicated- create
/etc/99-disable-network-offloading.shscript:#!/bin/bash #troubleshooting logging rm /tmp/disable-offloading-systemd-cat-pipe-info info=/tmp/disable-offloading-systemd-cat-pipe-info mkfifo "$info" trap "exec 3>&-; rm $info" EXIT systemd-cat -p info < "$info" & exec 3>"$info" DATESTAMP=`date +"%Y-%m-%d"` #enp1s0f0, enp1s0f1, enp1s0f2, enp1s0f3 IFLIST="enp1s0f0 enp1s0f1 enp1s0f2 enp1s0f3" unset RUNx710da4 for IFCHECK in $IFLIST; do if [ "$IFACE" == "$IFCHECK" ]; then RUNx710da4=true fi done if [ "$RUNx710da4" == "true" ]; then LOGFILE=/tmp/disable-offloading_$IFACE\_$DATESTAMP.log echo "Running from: $0">>$LOGFILE TOE_OPTIONS="rx tx sg tso ufo gso gro lro rxvlan txvlan rxhash ntuple-filters tx-gre-segmentation tx-gre-csum-segmentation tx-ipxip4-segmentation tx-ipxip6-segmentation tx-udp_tnl-segmentation tx-udp_tnl-csum-segmentation tx-gso-partial tx-udp-segmentation rx-udp_tunnel-port-offload" CMDLINE="" for TOE_OPTION in $TOE_OPTIONS; do CMDLINE+=" $TOE_OPTION off" done echo -n "$IFACE: $CMDLINE">>$LOGFILE && /sbin/ethtool -K $IFACE $CMDLINE>>$LOGFILE 2>&1 && echo "">>$LOGFILE unset RUNx710da4 fi #enp2s0, enp3s0, enp4s0, enp6s0 unset RUNi226v IFLIST="enp2s0 enp3s0 enp4s0 enp6s0" for IFCHECK in $IFLIST; do if [ "$IFACE" == "$IFCHECK" ]; then RUNi226v=true fi done if [ "$RUNi226v" == "true" ]; then LOGFILE=/tmp/disable-offloading_$IFACE\_$DATESTAMP.log echo "Running from: $0">>$LOGFILE TOE_OPTIONS="rx tx sg tso ufo gso gro lro rxvlan txvlan rxhash ntuple-filters tx-gre-segmentation tx-gre-csum-segmentation tx-ipxip4-segmentation tx-ipxip6-segmentation tx-udp_tnl-segmentation tx-udp_tnl-csum-segmentation tx-gso-partial tx-udp-segmentation rx-udp_tunnel-port-offload hw-tc-offload" CMDLINE="" for TOE_OPTION in $TOE_OPTIONS; do CMDLINE+=" $TOE_OPTION off" done echo -n "$IFACE: $CMDLINE">>$LOGFILE && /sbin/ethtool -K $IFACE $CMDLINE>>$LOGFILE 2>&1 && echo "">>$LOGFILE unset RUNi226v fi #br0, br1, br2, br0.1 etc.... IFLIST="br0 br1 br2 br0.1 br0.2 br0.3 br0.4 br0.5 br0.6 br0.7 br0.8 br0.9 br1.1 br1.2 br1.3 br1.4 br1.5 br1.6 br1.7 br1.8 br1.9 br2.1 br2.2 br2.3 br2.4 br2.5 br2.6 br2.7 br2.8 br2.9" unset RUNbridges for IFCHECK in $IFLIST; do if [ "$IFACE" == "$IFCHECK" ]; then RUNbridges=true fi done if [ "$RUNbridges" == "true" ]; then LOGFILE=/tmp/disable-offloading_$IFACE\_$DATESTAMP.log echo "Running from: $0">>$LOGFILE TOE_OPTIONS="rx tx sg tso ufo gso gro lro rxvlan txvlan rxhash ntuple-filters tx-gre-segmentation tx-gre-csum-segmentation tx-ipxip4-segmentation tx-ipxip6-segmentation tx-udp_tnl-segmentation tx-udp_tnl-csum-segmentation tx-gso-partial tx-udp-segmentation rx-udp_tunnel-port-offload hw-tc-offload" CMDLINE="" for TOE_OPTION in $TOE_OPTIONS; do CMDLINE+=" $TOE_OPTION off" done echo -n "$IFACE: $CMDLINE">>$LOGFILE && /sbin/ethtool -K $IFACE $CMDLINE>>$LOGFILE 2>&1 && echo "">>$LOGFILE unset RUNbridges fi #bond0, bond1 etc.... IFLIST="bond0 bond1" unset RUNbonds for IFCHECK in $IFLIST; do if [ "$IFACE" == "$IFCHECK" ]; then RUNbonds=true fi done if [ "$RUNbonds" == "true" ]; then LOGFILE=/tmp/disable-offloading_$IFACE\_$DATESTAMP.log echo "Running from: $0">>$LOGFILE TOE_OPTIONS="rx-checksumming tx-checksumming tx-checksum-ip-generic scatter-gather tx-scatter-gather tcp-segmentation-offload tx-tcp-segmentation tx-tcp-mangleid-segmentation tx-tcp6-segmentation generic-segmentation-offload generic-receive-offload large-receive-offload rx-vlan-offload tx-vlan-offload ntuple-filters receive-hashing rx-vlan-filter tx-gso-partial tx-udp-segmentation tx-nocache-copy hw-tc-offload rx-gro-list rx-udp-gro-forwarding tx-gre-segmentation tx-gre-csum-segmentation tx-ipxip4-segmentation tx-ipxip6-segmentation tx-udp_tnl-segmentation tx-udp_tnl-csum-segmentation tx-gso-partial tx-vlan-stag-hw-insert rx-vlan-stag-hw-parse rx-vlan-stag-filter" CMDLINE="" for TOE_OPTION in $TOE_OPTIONS; do CMDLINE+=" $TOE_OPTION off" done echo -n "$IFACE: $CMDLINE">>$LOGFILE && /sbin/ethtool -K $IFACE $CMDLINE>>$LOGFILE 2>&1 && echo "">>$LOGFILE unset RUNbonds fi
- create
-
- if using
NetworkManagerrenderer,networkd-dispatcheruses/usr/lib/networkd-dispatcher/*, butnetworkdrenderer uses/etc/networkd-dispatcher/*directories instead
- if using
- if, somehow none of the scripts are being triggered, an alternative is to create a custom
systemdservice:- create a
/etc/systemd/system/disable-network-offloading.servicefile:[Unit] Description=Runs script system post network start up. Wants=network-online.target After=network.target network-online.target [Service] Type=simple User=root ExecStart=/etc/99-disable-network-offloading.sh [Install] WantedBy=multi-user.target
- register the service then start it
systemctl daemon-reloadsystemctl start disable-network-offloading
- the only issue is that this does not work on “
vnetN” devices created when guest VMs are started
- create a
Repository Maintenance
- upgrading from old versions may have “remnant” repositories lurking around
- show the what is in the encoded
/etc/apt/trusted.gpgfile:apt-key --list
- manually remove individual entries (using the fingerprint):
apt-key del "xxxx xxxx xxxx xxxx xxxx xxxx xxxx xxxx xxxx xxxx"
- check the sources in
/etc/apt/sources.list.d - check the trusted sources in
/etc/apt/trusted.gpg.d - check sources in
/etc/apt/sources.list:- show what is in
/etc/apt/sources.list:add-apt-repository --list
- manually remove individual entries (using entire line):
add-apt-repository --remove "deb [arch=amd64] http://dl.google.com/linux/chrome/deb/ stable main"
- show what is in
- show the what is in the encoded
- purging removed packages with “
residual-config” (e.g. configuration files):apt list | grep residual-config | cut -d'/' -f1 | sudo xargs apt -y purge
- accidentally gave “apt install” on an existing package and then apt set the package to “manually installed”? revert the change easily:
apt-mark [manual|auto] <package>
Fix Broken/Partial/Stuck Package Installs
- try any of the following in order:
sudo dpkg --configure -asudo apt-get install -f- delete pending actions:
sudo rm -fr /var/lib/dpkg/updates/*
Serial Console
- trying to get Ubuntu to pipe everything through the serial console that may be available on your motherboard is a two-step process:
- getting GRUB to redirect everything (although tooling to do an install outright from console-only is out of scope here):
- make a backup before doing anything:
sudo cp /etc/default/grub /etc/default/grub.bak
sudo vi /etc/default/gruband add/edit the following lines:GRUB_CMDLINE_LINUX_DEFAULT="console=tty0 console=ttyS4,115200n8" GRUB_TERMINAL_INPUT="console serial" GRUB_TERMINAL_OUTPUT="console gfxterm serial" GRUB_SERIAL_COMMAND="serial --port=mmio,0xdf519000 --speed=115200 --word=8 --parity=no --stop=1"
- note that the
--portargument is usually replaced with--unit; I only document this parameter here in reference with another page – check the manual for more information
- note that the
- update grub (
sudo update-grub), and after step #2 below, reboot!
- make a backup before doing anything:
- getting Ubuntu to stick to the baud rate for a specific serial port (the “generic” agetty’s
--keep-bauddoes not seem to work!)- create a copy of the
serial-getty@tty.servicefile specific to the serial port (which in my example, isttyS4):sudo cp /lib/systemd/system/serial-getty\@.service /lib/systemd/system/serial-getty\@ttyS4.service
sudo vi /lib/systemd/system/serial-getty\@ttyS4.serviceand edit theagettycommand line to force the baud rate, e.g.:- changing:
ExecStart=-/sbin/agetty -o '-p -- \\u' --keep-baud 115200,57600,38400,9600 - $TERM
- to:
ExecStart=-/sbin/agetty --8bits ttyS4 115200 vt102
- changing:
- create a copy of the
- getting GRUB to redirect everything (although tooling to do an install outright from console-only is out of scope here):
2025/11/30 Update: Unfortunately, try as I might, I am simply unable to force the system to “stick” with the settings – sometime after start up, some component/service simply screws over the ttyS4 and I end up with corrupted garbage on screen. Things only get fixed after trying to change the baud rate (to 57600, 38400, 9600, etc.) and repeatedly pressing Enter and and CTRL-C – after some point of this (and yes, I confirmed it was due to user input since I once tried leaving it for an hour without it “getting fixed”), changing back to 115200 baud “miraculously” works.
-
-
- link the new service file:
ln -s /lib/systemd/system/serial-getty@ttyS4.service /etc/systemd/system/getty.target.wants/
- then reload
systemctland start the service:systemctl daemon-reloadsystemctl start serial-getty@ttyS4.service
- link the new service file:
-
QEMU and KVM
- ensure virtualization settings have been enabled in BIOS (e.g. Intel’s VT-x or AMD’s AMD-V)
- run the following:
apt install qemu-kvm libvirt-daemon-system libvirt-clients virt-manager
- add specific users to the kvm group to enable them to control VMs without using
sudo:adduser <user> kvm
- reboot
Disabling NIC Hardware Acceleration
- sometimes, NIC hardware acceleration breaks software network processing, like software routers, and so need to have certain features disabled – YMMV with the specific feature names below:
- check capabilities:
ethtool -k <device>
- disable specific capabilities:
ethtool -K <device> segmentation off tx-esp-segmentation off tx-vlan-stag-hw-insert off tx-vlan-offload off rx-vlan-stag-hw-parse off rx-vlan-stag-filter off tx-gso-list off tx-gso-robust off tx-fcoe-segmentation off tx-sctp-segmentation off tx-checksumming off tx-checksum-ip-generic off scatter-gather off tx-scatter-gather off tcp-segmentation-offload off tx-tcp-segmentation off tx-tcp-ecn-segmentation off tx-tcp-mangleid-segmentation off tx-tcp6-segmentation off generic-segmentation-offload off generic-receive-offload off netns-local off
- check capabilities:
- to “permanently” set this (or automatically set this at boot) check here.
Disabling/Changing libvirt‘s virbr0 NAT Interface
- in case the
libvirt-installed NAT virtual NIC interferes with anything, run the following commands to temporarily nuke the virtual NIC:sudo virsh net-destroy default
- to bring it back to life:
sudo virsh net-start default
- in case you need to change some settings (e.g. IP address), simply:
- copy the XML file and edit
cp /usr/share/libvirt/networks/default.xml /tmp/default.xml
- set libvirt to use new definition
sudo virsh net-destroy defaultsudo virsh net-undefine default # needed to avoid errors belowsudo virsh net-define /tmp/default.xml
- restart
libvirt‘s NAT interfacesudo virsh net-start default
- clean up
rm /tmp/default.xml
- copy the XML file and edit
Dual/Multi-Booting with Other OS
- refer here for more instructions
vi and vim
Although PuTTY on Windows does a wonderful job with defaults when ssh‘ing into an Ubuntu LTS bash shell, vi and vim still has some “stick-ups”… To fix this, I have to create/edit /etc/vim/vimrc.local:
- PuTTY defaults:
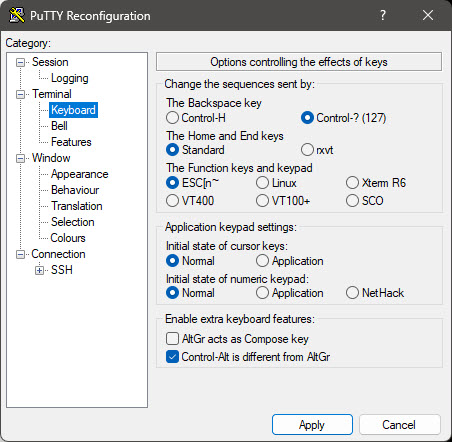
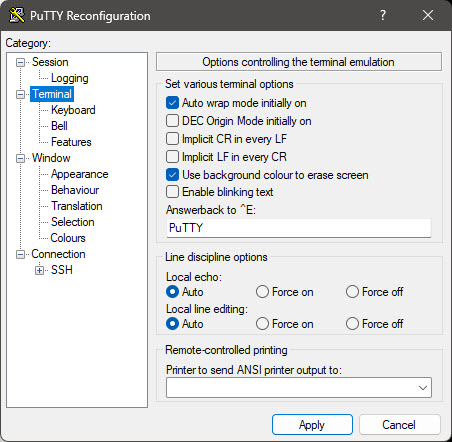
- with the NUMLOCK key and the 9 and 3 numberpad keys (on a full keyboard):
" Prevent vi remap of NUMLOCK key
noremap ^[OP <Nop>
inoremap ^[OP <Nop>
" Prevent vi remap of keypad keys
inoremap ^[Oy 9
inoremap ^[Os 3
noremap ^[Oy 9
noremap ^[Os 3
To key in the escape’d characters, in INSERT mode (press the ESC key multiple times to ensure you are out of whatever mode you may have been in, then press “i“), press CTRL–V then type the key in question (e.g. NUMLOCK key or keypad 9 or keypad 3).
